Have you ever noticed your evaporative humidifier isn’t quite as effective as it used to be, or perhaps detected a subtle, musty odor in the air? The silent culprit might be a neglected wicking filter. This essential component works tirelessly to absorb water and release clean, comfortable moisture into your home, but over time, it can accumulate mineral deposits and even become a breeding ground for bacteria if not properly maintained. Understanding how to clean your wicking filter is not just about extending your humidifier’s lifespan; it’s about ensuring the air you breathe is genuinely clean and healthy.
This comprehensive guide, tailored for both seasoned humidifier users and newcomers, will walk you through the entire process of revitalizing your evaporative humidifier’s wicking filter. From understanding its vital role to a step-by-step cleaning regimen and essential maintenance tips, you’ll gain all the knowledge needed to keep your air quality pristine and your humidifier operating at peak performance.
The Unseen Heroes: Why Your Humidifier’s Wicking Filter Matters
An evaporative humidifier relies on a simple yet highly effective natural process to add moisture to the air. The wicking filter, often resembling a dense paper or honeycomb-like material, is at the heart of this system. It absorbs water from the humidifier’s reservoir, increasing the surface area for evaporation. As the humidifier’s fan draws dry air across the moist filter, water naturally evaporates into the air, leaving impurities and mineral deposits behind on the filter itself.
This process highlights why a clean wicking filter is paramount. When mineral scale, dust, or mold spores build up on the filter, several problems arise. Firstly, the filter’s ability to absorb and wick water is severely diminished, leading to a noticeable drop in your humidifier’s efficiency. Secondly, a dirty filter can release airborne contaminants, potentially compromising the very air quality you’re trying to improve and even contributing to musty odors in your living space. Regularly cleaning this vital component ensures your humidifier continues to provide truly clean and healthy humidification.
Preparing for a Spotless Clean: What You’ll Need
Before embarking on the cleaning process, gathering the necessary supplies will ensure a smooth and efficient operation. Most of these items are likely already in your home, making humidifier maintenance a simple task.
Here’s a concise list of what you’ll need:
- Distilled White Vinegar: A natural disinfectant and descaler, perfect for breaking down mineral deposits.
- Warm Water: For rinsing and mixing solutions.
- A Soft Brush: An old toothbrush or a small scrub brush is ideal for gently removing stubborn residue.
- A Basin or Large Bowl: For soaking the filter.
- Clean Towels or a Drying Rack: To allow the filter to air dry thoroughly.
- Your Humidifier’s Owner’s Manual: Always a good reference for model-specific instructions.
Having these items on hand will prepare you to give your wicking filter the thorough cleaning it deserves, contributing to a healthier environment in your home.
Step-by-Step: How to Clean Your Evaporative Humidifier Wicking Filter
Cleaning your evaporative humidifier’s wicking filter is a straightforward process that can significantly improve your unit’s performance and the quality of your indoor air. Follow these steps for an effective and safe cleaning.
Safety First: Power Down Your Humidifier
|
Our Picks for the Best Humidifier in 2026
As an Amazon Associate I earn from qualifying purchases.
|
||
| Num | Product | Action |
|---|---|---|
| 1 | LEVOIT Classic 160 Top-Fill Ultrasonic Cool Mist Humidifier, Super Easy to Fill and Clean, Quiet Operation for Bedroom Home Baby & Plants, Auto Shut-off for Safety, 360° Rotating Nozzle, 2.5L, Black |

|
| 2 | DREO Humidifiers for Bedroom, 3L Top Fill 30H & 26dB Quiet Runtime for Large Room, Cool Mist Ultrasonic Humidifier with Humidity Sensor, Night Light for Home, Baby, Nursery, Plants, New Edition |
|
| 3 | LEVOIT OasisMist 1000S (10L) Smart Humidifier for Home Large Room Bedroom, Last 100 Hours Suitable for Indoor Plant, Cover up to 600ft², Easy Top Fill, Remoter & Voice Control, Auto Mode, Quiet, White |
|
| 4 | LEVOIT Top Fill Humidifiers for Bedroom, 2.5L Tank for Large Room, Easy to Fill & Clean, 28dB Quiet Cool Mist Air Humidifier for Home Baby Nursery & Plants, Auto Shut-off for Safety, 25H |
|
| 5 | Homvana Humidifiers for Bedroom Home, 3.6 L Cool Mist Top-Fill 34H Super Long Time, Quiet 23dB, Baby Humidifier, Oil Diffuser for Large Room, House, Plant, Nursery, Office, BPA FREE, Ultrasonic (Grey) |
|
| 6 | LEVOIT - Humidifiers for Bedroom - Quiet (3L Water Tank) - Cool Mist/Top Fill/Essential Oil Diffuser/25Watt - Home/Large Room - 360° Nozzle - Rapid Ultrasonic Humidification for Baby Nursery/Plant |
|
| 7 | LEVOIT Humidifiers for Bedroom Large Room Home, (6L) Cool Mist Top Fill Essential Oil Diffuser for Baby & Plants, Smart App & Voice Control, Rapid Humidification & Auto Mode - Quiet Sleep Mode, Gray |
|
| 8 | Dreo Smart Humidifiers for Bedroom, Top Fill 4L Supersized Humidifier Large Room with 28 dB, 36H Runtime, Touch/APP/Voice Control, Nightlight, Cool Mist Humidifiers for Baby, Plants, Indoor, Black |
|
| 9 | Dreo Humidifiers for Bedroom, 4L Top Fill for Large Room, 36H Runtime, 28 dB Quiet Supersized Cool Mist Air Humidifier for Baby Nursery, Plants, Indoor, Night Light, Easy to Clean & Fill, White |
|
| 10 | LEVOIT Humidifiers for Bedroom Home, Smart Warm and Cool Mist Air Humidifier for Large Room, Auto Customized Humidity, Fast Symptom Relief, Easy Top Fill, Essential Oil, Quiet, OasisMist4.5L, White |
|
Before touching any internal components, always prioritize safety. Turn off your evaporative humidifier and unplug it from the power outlet. This prevents any accidental activation or electrical hazards during the cleaning process.
Careful Disassembly: Accessing the Filter
Remove the humidifier’s water tank and set it aside. Depending on your model, the wicking filter may be easily accessible once the tank is removed, or you might need to unlatch a cover or remove a small panel. Gently pull the wicking filter free from its housing. Take care not to damage the filter material during removal. If you encounter any difficulty, consult your owner’s manual for specific instructions unique to your humidifier model.
Initial Rinse: Washing Away Loose Debris
Once the wicking filter is removed, take it to a sink and rinse it thoroughly under cool running water. This initial rinse helps to wash away any loose dust, dirt, or visible debris that has accumulated on the filter’s surface. You might notice some discoloration or small particles washing off, which is a normal part of the process.
The Soaking Solution: Tackling Mineral Buildup and Grime
Mineral deposits, often appearing as white or crusty residue, are the primary challenge for wicking filters, especially in areas with hard water. To combat this, prepare a soaking solution. A 50-50 mixture of distilled white vinegar and warm water is highly effective. Submerge the entire wicking filter into this solution in a basin or large bowl. Allow it to soak for approximately 45 minutes to an hour. This acidic solution will work to break down stubborn mineral buildup and also help to disinfect the filter.
Gentle Scrubbing: Removing Stubborn Deposits
After soaking, remove the filter from the vinegar solution. If there are still visible mineral deposits or stubborn grime, use a soft brush, such as an old toothbrush, to gently scrub these areas. Apply light pressure to avoid damaging the delicate filter material. The goal is to dislodge any remaining residue loosened by the soaking process.
Thorough Rinse: Eliminating Cleaning Residue
Following the soak and scrub, it’s crucial to rinse the wicking filter thoroughly under clean, running water. Continue rinsing until you can no longer detect the smell of vinegar and no more loosened particles or cleaning solution residue are coming off the filter. A complete rinse ensures that no unwanted substances are reintroduced into your humidifier or the air.
Complete Air Dry: Preventing Mold and Mildew
One of the most critical steps in cleaning your wicking filter is allowing it to air dry completely. Lay the rinsed filter flat on a clean towel or a drying rack in a well-ventilated area. Avoid placing it in direct sunlight or using artificial heat sources, as this can warp or damage the filter material. It’s essential that the filter is bone dry before it’s reinstalled; a damp filter can quickly become a breeding ground for mold and mildew. This drying process may take several hours.
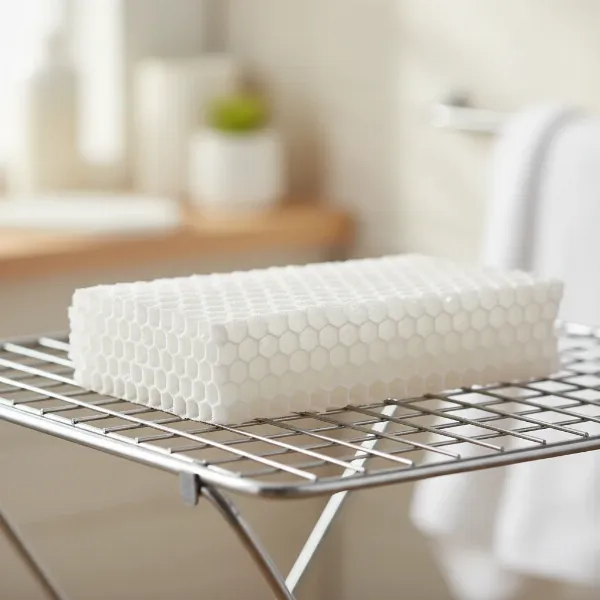 A clean evaporative humidifier wicking filter drying completely on a rack after cleaning to prevent mold.
Clean the Humidifier Tank: A Holistic Approach
While your wicking filter is drying, take the opportunity to clean the humidifier’s water tank and base. Residual water can lead to scale and bacterial growth in the tank. Use the same vinegar-and-water solution or a mild dish soap to scrub the interior of the tank and any other components that come into contact with water. Rinse everything thoroughly with clean water and wipe dry before reassembly. This comprehensive cleaning ensures your entire humidifier system is hygienic.
Reassembly and Revival: Putting It Back Together
Once both the wicking filter and the humidifier’s tank and base are completely dry, carefully reassemble your unit. Place the dry wicking filter back into its designated slot, reattach any covers or panels, and then refill the water tank with fresh, clean water, preferably distilled water to minimize future mineral buildup. Plug in your humidifier, and it’s ready to provide clean, efficient humidification once more.
When to Replace: Knowing When Your Wicking Filter Has Reached Its Limit
Even with diligent cleaning, wicking filters have a finite lifespan. Over time, mineral deposits can become deeply embedded and permanent, making the filter stiff and less effective at absorbing water. This can lead to a noticeable decrease in your humidifier’s mist output and overall performance. If, after a thorough cleaning, your filter remains discolored, rigid, or shows signs of permanent damage such as tearing or crumbling, it’s a clear indication that it has reached the end of its functional life and needs to be replaced.
Most manufacturers recommend replacing evaporative wicking filters every one to three months, depending on your water hardness and how frequently you use your humidifier. In areas with very hard water, you might find yourself needing to replace them more often. Regular inspection will help you determine the optimal replacement schedule for your specific conditions. Ignoring these signs and continuing to use an exhausted filter not only reduces your humidifier’s efficiency but also risks circulating impurities into your indoor air.
Essential Tips for Wicking Filter Longevity and Performance
Beyond regular cleaning, a few proactive measures can significantly extend the life and enhance the performance of your evaporative humidifier’s wicking filter. Implementing these habits can save you time, money, and ensure consistently better air quality.
- Use Distilled Water: Tap water contains minerals that contribute to scale buildup on your filter. Using distilled water virtually eliminates this issue, dramatically reducing the frequency of cleaning and extending the filter’s useful life.
- Establish a Regular Cleaning Schedule: Consistency is key. Aim to clean your wicking filter at least once a week if you use your humidifier daily, or every two weeks if usage is less frequent. This prevents heavy mineral accumulation and bacterial growth.
- Never Use Harsh Chemicals: Avoid using bleach, abrasive cleaners, or other harsh chemicals on your wicking filter. These can damage the filter material, reduce its effectiveness, and potentially release harmful fumes into your air. Stick to vinegar and mild detergents as recommended.
- Proper Storage: If you put your humidifier away for an extended period, ensure the filter is thoroughly cleaned and completely dry before storing it. Storing a damp filter can lead to mold and mildew growth, rendering it unusable next season.
> “A well-maintained humidifier is a silent guardian of your health. Neglecting the wicking filter is like expecting a marathon runner to perform with tied shoelaces; it simply won’t deliver its best. Consistent, gentle cleaning is the secret to enduring performance and truly clean air.” – Humidifier.com Admin, Seasoned Humidifier Technician
These simple practices ensure your wicking filter remains efficient, providing you with consistent, healthy moisture for longer.
Conclusion
Maintaining the wicking filter of your evaporative humidifier is a simple, yet profoundly impactful task that directly contributes to a healthier living environment. From preventing the circulation of airborne impurities to ensuring your unit operates at peak efficiency, a clean filter is fundamental to enjoying the full benefits of humidification. By following the clear, step-by-step cleaning guide and integrating smart maintenance habits into your routine, you can confidently prolong the life of your humidifier and consistently provide your home with optimal air quality.
Remember, a little routine care goes a long way in safeguarding your health and comfort. How often will you commit to giving your evaporative humidifier’s wicking filter the attention it deserves?
Frequently Asked Questions
How often should I clean my evaporative humidifier wick filter?
For optimal performance and hygiene, it’s recommended to clean your evaporative humidifier’s wicking filter at least once a week, especially with daily use or if you have hard water. Regular cleaning prevents excessive mineral buildup and inhibits bacterial growth, ensuring consistent, clean moisture output.
Can I use bleach to clean my humidifier wick filter?
No, you should never use bleach to clean your humidifier wick filter. Bleach can damage the filter material, reduce its effectiveness, and release harmful fumes into your indoor air. Always opt for milder, natural solutions like distilled white vinegar and water.
What if my wick filter is still dirty after cleaning?
If your wick filter remains discolored, stiff with mineral deposits, or shows signs of damage after a thorough cleaning, it indicates that the filter has reached the end of its lifespan. At this point, it’s essential to replace the filter with a new one to maintain efficient and healthy humidification.
Why does my humidifier wick filter get hard?
Humidifier wick filters become hard due to the accumulation of mineral deposits from tap water. As water evaporates, minerals are left behind on the filter. Over time, these minerals calcify, making the filter stiff and impairing its ability to absorb and wick water effectively, reducing humidifier performance.