Maintaining optimal indoor humidity is essential for comfort and health, and your humidifier plays a crucial role in achieving this balance. However, if you live in an area with hard water, you’ve likely encountered the persistent problem of mineral buildup, specifically calcium deposits. This white, chalky residue can accumulate on various components, but none is more critical, or more susceptible, than the humidifier’s transducer. When left unchecked, this buildup can severely hinder your unit’s performance, leading to reduced mist output and even premature failure. Understanding how to effectively remove and prevent calcium buildup from this delicate component is key to ensuring your humidifier runs efficiently and provides the clean, healthy mist you rely on.
The Silent Threat: Understanding Calcium Buildup in Your Humidifier
Calcium buildup, often referred to as limescale or mineral deposits, originates from the minerals naturally present in tap water, predominantly calcium and magnesium. As your humidifier operates, water evaporates, leaving these minerals behind. Over time, these residual minerals crystallize and harden, forming a stubborn crust. This phenomenon is particularly pronounced on the transducer of ultrasonic humidifiers. The transducer, a small ceramic disc or oscillator, vibrates at extremely high frequencies to create a fine mist. When covered in mineral deposits, its ability to vibrate effectively is compromised, directly impacting the humidifier’s misting capability. Similarly, in warm mist humidifiers, heating elements can become caked with these deposits, reducing heating efficiency.
Recognizing the symptoms of a calcified transducer is crucial for timely intervention. You might notice a significant decrease in mist output, a “white dust” appearing on nearby surfaces, or the humidifier struggling to produce any mist at all. Some units might even become noisier or shut off unexpectedly due to the strain caused by the buildup. The implications extend beyond mere inconvenience; reduced efficiency means your humidifier works harder, consuming more energy and shortening its lifespan. More critically, heavy buildup can create a breeding ground for bacteria and mold, potentially impacting the air quality it’s meant to improve. Addressing this issue promptly not only restores your humidifier’s performance but also safeguards your indoor air.
Gather Your Descaling Arsenal: Tools You’ll Need
Tackling calcium buildup on your humidifier’s transducer requires a gentle yet effective approach. Fortunately, the necessary tools are typically common household items, ensuring that the process is both accessible and cost-effective.
To begin your descaling mission, gather the following:
- White Vinegar: This is your primary weapon against mineral deposits. Its acetic acid content is powerful enough to dissolve calcium without damaging most humidifier components. You may need it undiluted for stubborn buildup or mixed with water for lighter cleaning.
- Soft Brush or Cotton Swab: An old toothbrush works perfectly for reaching crevices and gently scrubbing the transducer. A cotton swab is ideal for precise cleaning of the delicate ceramic disc.
- Clean Cloths: Microfiber or soft cotton cloths are excellent for wiping down surfaces and ensuring a thorough rinse.
- Small Bowl: Useful for soaking smaller, removable components like the transducer itself.
- Gloves (Optional): While vinegar is generally safe, gloves can protect sensitive skin during the cleaning process.
For particularly challenging buildup that white vinegar alone struggles to remove, consider having a small quantity of powdered citric acid on hand. This food-grade acid is a potent descaler and can be found online or in canning supply sections of grocery stores. Always ensure you have a supply of distilled or demineralized water available to refill your humidifier after cleaning, as this is the best defense against future mineral accumulation.
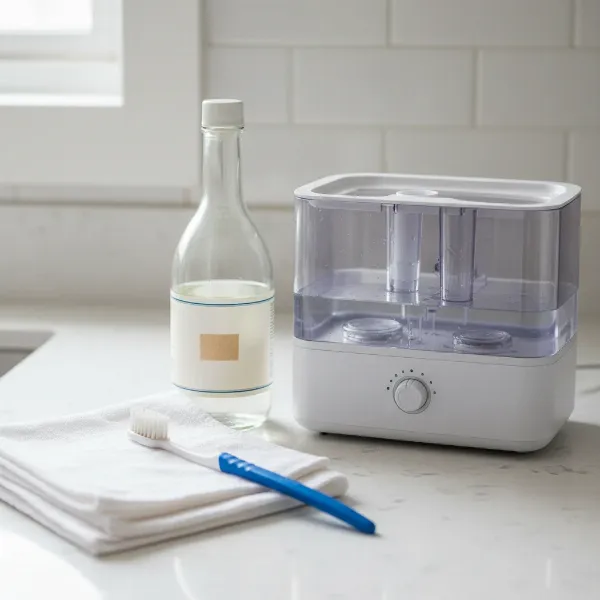 A collection of humidifier cleaning supplies including white vinegar, an old toothbrush, and clean cloths.
Step-by-Step Descaling: Revitalizing Your Humidifier Transducer
Cleaning your humidifier’s transducer is a straightforward process, but it requires attention to detail and a gentle touch to avoid damage. Follow these steps to effectively remove calcium buildup and restore your unit’s performance:
- Safety First: Unplug and Disassemble. Before touching any part of your humidifier, always ensure it is turned off and unplugged from the power outlet. Safety is paramount. Next, carefully disassemble your humidifier according to the manufacturer’s instructions. This typically involves removing the water tank from the base.
- Empty and Initial Wipe. Pour out any remaining water from both the tank and the base. Use a clean cloth to wipe down any easily accessible surfaces, removing loose dust or debris.
- Target the Transducer with Vinegar.
- If the transducer is removable: Gently detach the transducer or ceramic disc. Place it in a small bowl and submerge it completely in undiluted white vinegar.
- If the transducer is fixed: Carefully pour white vinegar directly into the humidifier’s base or reservoir, ensuring the transducer is fully submerged. Depending on your humidifier’s design, you might need to add water to dilute the vinegar if suggested by the manufacturer, but often undiluted vinegar is most effective for direct transducer treatment.
- Soak Time for Dissolution. Allow the transducer to soak for 15 to 30 minutes for light buildup. For more severe or hardened deposits, you can extend the soaking time to a few hours, or even overnight. The vinegar’s acidity will work to break down the mineral bonds. “For really tough calcification, an overnight soak in undiluted white vinegar can make a significant difference, softening deposits that seemed impenetrable before.”
- Gentle Scrub to Remove Deposits. After soaking, the mineral deposits should be significantly softened. Use a soft brush, like an old toothbrush, or a cotton swab to gently scrub away the remaining calcium from the transducer’s surface and any surrounding components. Be extremely careful not to scratch or damage the delicate surface of the transducer. Avoid using abrasive materials, as these can permanently impair its function.
- Rinse Thoroughly to Eliminate Residue. This step is critical. Rinse all cleaned parts, especially the transducer, under cool, running water until there is absolutely no trace of vinegar smell or residue. Any remaining vinegar can affect the mist quality and potentially release unpleasant odors when the humidifier is in use.
- Air Dry Completely to Prevent Mold. Lay all parts out on a clean towel to air dry completely. Ensuring every component is thoroughly dry before reassembly is vital to prevent the growth of mold and mildew, which can thrive in damp environments.
- Reassemble and Test. Once everything is dry, carefully reassemble your humidifier. Fill the tank with fresh, preferably distilled water, and test its operation. You should notice a significant improvement in mist output and overall performance.
Beyond Cleaning: Preventing Future Transducer Buildup
While effective cleaning is crucial, the true secret to a long-lasting and efficient humidifier lies in proactive prevention. By adopting a few simple habits, you can dramatically reduce the occurrence of calcium buildup on your transducer and other components.
The Power of Pure Water: The single most impactful change you can make is to switch from tap water to distilled or demineralized water. Tap water, especially in hard water regions, is laden with minerals that are the root cause of limescale. Distilled water has had these minerals removed, virtually eliminating the source of buildup. While it might seem like an extra expense, the extended lifespan of your humidifier, reduced cleaning frequency, and consistent performance make it a worthwhile investment.
Establish a Consistent Cleaning Routine: Regular maintenance is your second line of defense. Even with distilled water, tiny impurities can accumulate over time. Aim to clean your humidifier, particularly the transducer area, at least once a week if you use it daily. If usage is intermittent, clean it every two weeks or before storing it. A quick rinse and wipe-down with a vinegar solution will prevent minerals from hardening and becoming a major problem.
Demineralization Cartridges and Filters: Many humidifiers, especially ultrasonic models, come with demineralization cartridges or filters. These are designed to capture minerals from tap water before they reach the transducer. While not as effective as distilled water, they offer a significant improvement over untreated tap water. Remember to replace these cartridges according to the manufacturer’s recommendations, typically every 30 to 90 days, depending on your water hardness and usage frequency. Neglecting to replace them renders them ineffective.
Consider Humidifier Cleaning Solutions: On the market, you can find specialized humidifier cleaning solutions or descalers. These products are formulated to dissolve mineral buildup. If you choose to use one, always read the instructions carefully and ensure it’s safe for your specific humidifier model. Most importantly, follow up with extremely thorough rinsing to ensure no chemical residues remain, as these could be harmful when aerosolized into your home’s air.
Nurturing Your Humidifier: General Maintenance Tips
Beyond the crucial task of descaling the transducer, adopting a holistic approach to humidifier maintenance will ensure your unit operates at its best for years to come. These practices are simple, yet profoundly impactful, safeguarding both your investment and your indoor air quality.
First and foremost, change the water daily. Stagnant water is a prime environment for bacteria, mold, and algae to flourish, which can then be dispersed into your air along with the mist. Starting each day with fresh water helps to prevent this unhealthy growth and keeps your humidifier hygienic. When refilling, give the water tank a quick rinse to remove any loose debris.
Furthermore, make regular cleaning of the water tank and base a consistent habit. Even if you use distilled water, minor residues can still accumulate. A weekly cleaning, using a white vinegar solution as described for the transducer, will keep these larger components free from slime, mold, and mineral deposits. Remember to pay attention to corners and crevices where contaminants can hide.
Finally, proper storage is vital when your humidifier is not in use, especially during off-seasons. Before packing it away, perform a thorough deep clean, ensuring all components are completely dry. Store the humidifier in a cool, dry place, away from direct sunlight and extreme temperatures, to prevent internal damage and discourage mold growth during dormancy. By embracing these general maintenance tips alongside dedicated transducer care, you’ll ensure your humidifier remains a dependable source of clean, comfortable air for the long haul.
Conclusion
The humble humidifier plays a vital role in our health and comfort, yet its performance often hinges on the meticulous care of one small, yet powerful, component: the transducer. As an experienced technician, I’ve seen firsthand how easily calcium buildup can sabotage even the best units, turning a beneficial device into a source of frustration. Understanding why these mineral deposits form and knowing how to effectively remove them with simple household solutions like white vinegar is not just about extending your humidifier’s lifespan; it’s about ensuring it delivers pure, healthy mist day after day.
From the initial disassembly to the careful scrubbing and thorough rinsing, each step in descaling your transducer directly contributes to your humidifier’s efficiency and your home’s air quality. But beyond reactive cleaning, embracing a proactive approach—using distilled water and establishing a regular maintenance schedule—is the ultimate safeguard. Your humidifier is an investment in your well-being. By dedicating a little time to its care, particularly its transducer, you ensure it continues to serve you faithfully. What simple step will you take this week to keep your humidifier running like new?
Frequently Asked Questions
How often should I clean my humidifier’s transducer?
|
Our Picks for the Best Humidifier in 2026
As an Amazon Associate I earn from qualifying purchases.
|
||
| Num | Product | Action |
|---|---|---|
| 1 | Dreo Smart Humidifiers for Bedroom, Top Fill 4L Supersized Humidifier Large Room with 28 dB, 36H Runtime, Touch/APP/Voice Control, Nightlight, Cool Mist Humidifiers for Baby, Plants, Indoor, Black |

|
| 2 | LEVOIT - Humidifiers for Bedroom - Quiet (3L Water Tank) - Cool Mist/Top Fill/Essential Oil Diffuser/25Watt - Home/Large Room - 360° Nozzle - Rapid Ultrasonic Humidification for Baby Nursery/Plant |
|
| 3 | MegaWise Topfill 7-colour Night light humidifier for Kid bedroom with 3.5L Large Capacity, No leakage Design Fine Mist Output Auto Shutoff, Essential Oil Safe Tank |
|
| 4 | Dreo Humidifiers for Bedroom, 4L Top Fill for Large Room, 36H Runtime, 28 dB Quiet Supersized Cool Mist Air Humidifier for Baby Nursery, Plants, Indoor, Night Light, Easy to Clean & Fill, White |
|
| 5 | COO Humidifiers for Bedroom, 2L Tank for Large Room, 30 Hour Runtime, 28dB Quiet Cool Mist Humidifier for Home, Baby Nursery, Plants, Indoor, Office, Easy to Fill & Clean,Night Light and Auto Shut-off |
|
| 6 | LEVOIT Top Fill Humidifiers for Bedroom, 2.5L Tank for Large Room, Easy to Fill & Clean, 28dB Quiet Cool Mist Air Humidifier for Home Baby Nursery & Plants, Auto Shut-off for Safety, 25H |
|
| 7 | Homvana Humidifiers for Bedroom Home, 3.6 L Cool Mist Top-Fill 34H Super Long Time, Quiet 23dB, Baby Humidifier, Oil Diffuser for Large Room, House, Plant, Nursery, Office, BPA FREE, Ultrasonic (Grey) |
|
| 8 | LEVOIT Humidifiers for Bedroom Large Room Home, (6L) Cool Mist Top Fill Essential Oil Diffuser for Baby & Plants, Smart App & Voice Control, Rapid Humidification & Auto Mode - Quiet Sleep Mode, Gray |
|
| 9 | DREO Humidifiers for Bedroom, 3L Top Fill 30H & 26dB Quiet Runtime for Large Room, Cool Mist Ultrasonic Humidifier with Humidity Sensor, Night Light for Home, Baby, Nursery, Plants, New Edition |
|
| 10 | DREO 6L Top Fill Humidifiers for Bedroom, 60H Runtime 28 dB Quiet Supersized Cool Mist Air Humidifiers for Large Room, Baby Nursery, Plant, Indoor, Night Light, Easy to Clean, Precise Humidity Control |
|
For optimal performance and to prevent significant buildup, it’s recommended to clean your humidifier’s transducer at least once a week, especially if you use tap water regularly or operate the humidifier daily during peak seasons. If using distilled water, bi-weekly cleaning may suffice.
Can I use bleach to clean the transducer?
While bleach is an excellent sanitizing agent, it is generally not recommended for descaling mineral buildup. More importantly, never mix bleach with vinegar or other acidic cleaners, as this can create dangerous toxic gases. Stick to white vinegar or citric acid for mineral removal.
What happens if I don’t remove calcium buildup from the transducer?
Ignoring calcium buildup on the transducer will lead to decreased mist output, reduced humidifier efficiency, and an increased risk of permanent damage to the unit. It can also contribute to the release of “white dust” into your air and potentially foster bacterial growth if left uncleaned.
Is white vinegar safe for all humidifiers?
White vinegar is generally safe for most humidifiers, particularly for dissolving mineral deposits. However, always refer to your humidifier’s owner’s manual for specific cleaning instructions and any materials to avoid. For delicate parts like the transducer, always use a soft brush or cloth.
Can I use tap water if I clean regularly?
While regular cleaning can mitigate some of the effects of hard tap water, using distilled or demineralized water is always the superior choice for preventing calcium buildup on the transducer. Even with frequent cleaning, hard water will accelerate mineral accumulation, requiring more effort to maintain optimal performance.